About Me

My photo
Emigrated from America to New Zealand and never looked back. Couldn't have asked for a better husband, family & life!
Showing posts with label Snacks. Show all posts

PANCIT CANTON

PANCIT CANTON

I love this dish! There are many, many different versions of this Filipino dish and you can add just about anything you like in the form of different meats, and veggies and even different sorts of noodles. It doesn’t need anything else because it’s wonderful just like this, but different people have different tastes, so modify away!

The only key ingredients that truly make it a genuine pancit, and are non-negotiable, are: Onions, Garlic, Chinese Sausages and noodles…everything else is a personal choice!
I love the baby mung bean sprouts, so I added them to my recipe. I also sometimes add baby corn or water chestnuts, but this recipe is to be modified according to your own taste, so feel free to add or subtract away…you’ll need to multiply too if you plan on taking it to a party because this dish goes FAST!!!


INGREDIENTS:

3 Tbsp Oil
1 Onion, finely chopped
3 Cloves Garlic, crushed
500 Gm Meat , (sliced Chinese sausage, and anything else you want to add)
1 Stalk Celery, diced
1 Shredded Carrot
¼ Head of Cabbage
250 Gm Mung Bean Sprouts
4 Cups Stock
(Chicken, Beef, Veg…doesn’t matter)2 Eggs, sliced
3 Spring Onions, chopped
*Noodles
*Sesame Oil
*Sesame Seeds, lightly toasted
*Good Soy Sauce to brown and season the noodles (I used Mushroom Soy Sauce)
*Freshly Ground Black Pepper

*Amounts vary to individual tastes.

DIRECTIONS:

Heat the oil in the saucepan and soften the onion first.

Next, add the garlic and cook for an additional minute before adding the next ingredients. The onion should just start to brown.
Now add a bit of soy sauce and black pepper.
Next, add your Chinese sausage (essential ingredient for this dish and cannot be substituted, to my knowledge) and any other meat you like (shredded chicken, shrimp, diced beef, etc.), and cook until the sausage pieces begin to brown.

Now add the celery, carrots, cabbage & bean sprouts and cover the pan allowing the veggies to steam for a few minutes. At this stage you can choose to add more soy sauce & pepper for flavour if you like.

Meanwhile, boil some stock for your noodles and cook the noodles in your stock according to the package (use pancit canton noodles if you can find them, but rice stick noodles and many others are perfectly acceptable for this dish).

Now, grab a large bowl and combine the noodles and the cooked mix really well.

Top it all off with your egg slices, a bit of sesame oil, toasted sesame seeds, and the spring onions (scallions).

This is a wonderfully tasty dish and can be served hot or cold.


CHOCOLATE, COCONUT, OATMEAL NO-BAKE COOKIES

CHOCOLATE, COCONUT, OATMEAL NO-BAKE COOKIES


What a week. Baby went with her school mates on her first school camping trip. It was 4 days and 3 nights which seemed very long to this overprotective American Mum who worries too much. She came home yesterday afternoon safe & sound, albeit quite knackered (exhausted to the point I thought she would fall asleep in the car). She wrote notes for herself to remember the highlights from each day and read them back to us in the car on the way home from the train station.
I took her day pack into the house before marching her upstairs for a much needed bath, and noticed it was unusually heavy for what should have been in it...well...when I emptied the bag, in addition to 3 full sandwiches, 2 apples, 1 and a half snack bars (presumably her lunches from the last 3 days), and a wet towel, I also pulled out several rocks, about 2 cups of beach sand (minimum) and a dead sea sponge! (Some of the loot is pictured below and even the cat was perplexed.)
Imagine reaching into a bag for a towel to launder, and touching THAT thing! Eeyuck! LOL


Now, back to the cookies...I was to send a batch of baked treats (no one necessarily knew these weren't technically "baked") along with the other families doing the same, for the kids and their teachers & other adults to enjoy as afternoon snacks and such. So, of course I had many recipes to choose from...too many, and I needed a quick decision so I asked a friend in Oregon to help me out. She directed me to her mate's site and this recipe, which was a great help and an easy and tasty recipe to try. As a matter of fact, I made two double batches...one for Baby to take to camp and another to share between home and work. So, thank you Pam & Cheryl, for your assistance.
In Pam's post, she mentions that the cookies were a bit moist and not to make them in humid weather, however...I have added a bit more sugar to make the chocolate syrup just a bit "stickier" to hold together and, I dried them "Pavlova style" in the oven afterwards and they were perfect!
Here we go...this is for my double batch, so halve everything if you only want about a dozen or so cookies.
INGREDIENTS:
½ Cup Milk
½ Cup Butter
2 Cups Sugar
6 Tbsp Cocoa Powder
1½ Tsp Vanilla Essense or Extract
3 Cups Quick Oats (like for breakfast cereal)
1 ½ Cups Coconut (finer texture is better)

DIRECTIONS:
In a medium saucepan, melt the butter and add the cocoa powder, sugar and milk then bring to a boil for 2 minutes.

Next, remove the mixture from the heat and add the vanilla, oats and coconut and mix until thoroughly combined.

Now, using gloves or two spoons, drop spoonfuls onto a non-stick mat or baking tray lined with paper and wait until dry.

If the cookies are still too moist or fragile to move & stack, heat an oven to about 210°F/100°C and turn it off once it’s warm, then put the cookies in for an hour or two to set.

Just like you would expect, they do taste a bit like a Mounds or Cherry Ripe candy bar (without the cherry).

Enjoy.

STUFFED PORTOBELLO MUSHROOMS

STUFFED PORTOBELLO MUSHROOMS


There are a few things that I really love to cook with, yet fail to use regularly on account of my daughter’s finicky palate. One of those items is the mushroom...Portabellos (or Portabellas) to be more specific, no matter how you like to say or spell it. Since my daughter has yet to develop a more refined appreciation for some of nature’s bounty, I only make these types of recipes once in a blue moon (which also means that I am making another separate dish for her).

Just how did I become this easily manipulated??? Well, one only needs to look into that little angelic face and stare into those deep hazel eyes as the lashes flutter so innocently when she says “please Mummy?” to know she has the upper hand. (sigh) Ah well, she doesn’t get away with murder though...I choose my battles carefully and, I still grate some carrot and courgette into her mac-n-cheese before presenting her supper to her. (Yeah, okay...I know.)

The mushroom is such a vital flavour in so many dishes...stroganoffs, gravies and sauces, even in some soups, so I can’t go totally cold turkey now, can I? No, I usually need to dice them up so finely that our little darling cannot detect any “chunks” and that is, for the most part, a satisfactory compromise. However, sometimes I just need to really savour a genuine, pureley perfect mouthful of this fungi (usually accompanied by some form of another fungi relative – cheese).


On another note, I also have so say how truly impressed with the speed of my new Dell device - WOW! This is going to make blogging, Facebook networking, emails, web surfing and all of that other fun stuff SOOO much easier now. Even my hubby likes the "flash new system", so I think I done picked a good'n y'all! ;o)

So, without further adieu...


INGREDIENTS:

10 Portabello Mushrooms
2 Cups Breadcrumbs
150 Gm (5 Oz) Camembert Cheese
50 Gm (2 Oz) Pariggiano Reggiano, freshly grated
2 Cloves Garlic
1 Red Onion, finely chopped
3 Tbsp (good handful) Basil, finely chopped
¼ Cup Milk
2 Tbsp Extra Virgin Olive Oil

*2 Tbsp Sour Cream
*Serve as a side sauce

DIRECTIONS:

Preheat your oven to 180° C (350° F)

In a food processor, finely chop the mushroom stalks, cheeses, garlic, onion and basil.

Add in the breadrumbs, milk, and oil and pulse a few times just to combine, as you still want a fairly coarse mixture. Add a bit more milk if it is too dry to stick together.

Roll the stuffing into 10 roughly equal sized balls and flatten each into each mushroom cap. Press moderately to make sure the stuffing gets into the mushroom gills.

Arrange the stuffed mushrooms in a single layer in a baking dish and cook for 15-20 minutes before turning the oven to grill/broil for an additional 5 minutes to brown the tops.

Regular white onions can be used in a pinch and if you don’t like Camembert cheese you can try substituting another semisoft cheese in its place. Also, croutons or even fresh bread may be used instead of crumbs, however, if you use fresh bread slices, cut back on (or eliminate) the milk.

Happy cooking!


VELVET CUPCAKES

HAPPY BIRTHDAY, BABY!

Today was the last school day prior to baby's birthday, so I had to make the class some cupcakes. I don't like to do the same every year, so I decided to try a new recipe this time...with a twist. One of my Christmas presents this year, was a new cookbook from my lovely husband. He gave me the "Jamie's America" book by Jamie Oliver (one of my favourite Food Channel personalities). On page 38 is a recipe for very chocolaty Velvet Cupcakes, which looked great, but the problem is that my little girl prefers "vanilla" to chocolate. No problem!!!

I used the basic Velvet Cupcake recipe, but rather than adding cocoa, I just added a bit more flour to make up for it. Also, for flavour, I added a bit extra vanilla essence and a little almond essence and left out the food colouring.

This batter is a little different from my other cupcake recipes for a couple of reasons. One reason is that this recipe uses egg and buttermilk, and the other reason is that the batter is thick, but "fluffy". I have been thinking of how I might describe the texture of the batter, and the only thing that comes to mind is "fluffy" almost mousse-like, but in a thicker, slightly heavier way.

I don't want to plagiarize Mr. Oliver, but I will give you the gist of this recipe, as it is a common cake base recipe used in the States. The "velvet" result is similar to the texture of the good ole' American Hostess brand cakes...yumm!

Here we go:

INGREDIENTS:

50 Gm Butter, softened
150 Gm Caster Sugar (fine granules)
1 Large Egg
2 Teaspoons Vanilla Extract/Essence or Paste
1 Tsp Almond Essence
160 Gm High Grade Flour
125 Ml Buttermilk
½ Tsp Baking Soda
1 ½ Tsp White Vinegar


DIRECTIONS:

Preheat oven to 180°C / 350°F and line muffin tin with paper liners or silicone cups. (I sprayed demitasse cups with cooking spray and baked the cakes in those).

Cream the butter & sugar together with a mixer until fluffy.

Beat in the egg, vanilla, and almond essence.

Carefully fold in half of the flour then mix in half of the buttermilk, then repeat with the other half of each. Once well combined, the mixture should be very smooth and fluffy.

In a small cup, mix the baking soda and vinegar and mix into the batter carefully until well combined.

Divide this batter evenly between cupcake liners (or demitasse cups) then bake for 20-25 minutes or until toothpick inserted comes out clean.

FROSTING: I made a simple mascarpone frosting using 4 tbsp soft butter, 8 oz mascarpone cheese, ~3 cups icing sugar and a squeeze of orange juice. Cream the butter & cheese until fluffy, then add the juice (or about a half teaspoon of vanilla essence) and mix in the sugar, one cup at-a-time until you get the desired consistency.

Enjoy!

EGGNOG KISSES

EGGNOG KISSES


Traditionally, I don’t do a lot of “holiday baking” like my grandma and her sisters usually did. I do, however, enjoy making a few more “unique” things to share with friends. Recently, a friend shared some homemade eggnog (lower-fat version) which was very nice and inspired my to ring my Dad and see if he still remembered the proportions for his full-fat version (which he did share with me, and I can post here later if time allows).

Not too long after that, I believe, I noted this recipe posted on a fellow food blogger’s site at
Cooking Down Under. This is another American transplant foodie only she is living “across the ditch” in Aussie and I live here in lovely Aotearoa (literally translates to “Land of the long white cloud” – or more simply, New Zealand).

Anyway, I saw this recipe and just had to try it to see if these biscuits/cookies truly tasted like eggnog (and they really did have a mild noggy flavour). I will say though, that for more nogginess, I have doubled the vanilla and added nutmeg in the dough, then slightly increased the rum in the icing – Perfection!

Only a couple of shopping days left now and I think we are all set in my household. I hope you are all done with your Christmas shopping and looking forward to a great holiday and even better new year! Best wishes to you all.

Meri Kirihimete!

INGREDIENTS:

DOUGH
¾ Cup Butter
½ Cup Sugar
¼ Cup Packed Brown Sugar
1 Tsp Vanilla
1 Egg
¼ Tsp Salt
1 Tsp Nutmeg
2 Cups Flour, sifted

FILLING¼ Cup Butter
¾ Cup Sifted Icing Sugar (powdered/confectioners sugar)
*1½ Tbsp Rum
*Ground nutmeg

* Amounts vary to individual tastes.

DIRECTIONS:

In a large bowl, beat ¾ Cup butter (or margarine) until softened.

Add sugar and brown sugar and beat until creamy.

Now add egg, vanilla, salt, and beat well.

Slowly incorporate the flour and mix until well combined.

Wrap in cooking paper and/or cling film and chill for about 1 hour or until no longer soft.

Shape into 1 inch balls, then place them approximately 2 inches apart on an ungreased cookie sheet, or a baking sheet lined with baking paper or a silicone baking mat.

Press down centers with thumb (or, in my case I used the backside of a ½ Tsp measuring spoon.

Now, bake in a 180 C (350 F) oven for about 12 minutes, or until done.

Remove and cool completely before filling.

To make the filling, using a small bowl and fork, beat ¼ Cup butter until softened then slowly add powdered sugar and beat/whisk until fluffy.

Next, add the rum and mix well.

Spoon about ½ Tsp of filling into the centre of each cookie then sprinkle each with just a bit of nutmeg.

Chill the cookies until the filling is firm, then enjoy!


PISTACHIO COOKIES

Well, here's my second attempt at a mobile blog entry (myapologies for the lack of decent photography). ;o) I am planning another trip out to J&L's farm this weekend, so I wanted to bake some treats to bring along as I hate arriving anywhere empty-handed. I was just itching for an excuse to open up a new packet of pistachios so I looked all over for a decent looking recipe to try.

When I came upon this recipe, I just knew this was the one, as I had 2 boxes of my favourite American custard powder (Jello brand instant pudding - pistachio flavour) so I just had to try it out... I have never made cookies with any sort of custard powder before, but it sounded like it might be okay.

I do have to say though, that these are sort of a light & fluffy type cookie, not the typical crunchy, crumbly biscuit that so many Kiwis seem to prefer. Now, if you are keen to give this one a go, but cannot imagine where you'd begin to look for Jello pudding, you can talk to your local importers (like Davis Trading Company, for example), or purchase it through www.expatexpress.com. Either way, you should have access to the right stuff.

So...here we go!

INGREDIENTS:
1/2 Cup Butter (200 Gm)
1 Box Instant Pistachio Pudding Mix
1/2 Tsp Baking Soda
1 Cup Flour
1 Cup Chocolate Chips
1 Cup Pistachio Kernels

DIRECTIONS:
First, Preheat oven total 180 C/350 F.

In a medium bowl, cream the butter with the pudding mix.

Next, add in the egg and combine well.

Now, sift the flour & soda in and mix well.

Finally, add the chocolate chips and nuts and mix until well incorporated into the dough.

Roll into balls and flatten out onto a lined baking pan and bake at 180 C/350 F for about 10 minutes. Make sure to remove cookies before they begin to brown.

This will make about 2 dozen small Cookies...Mmm Enjoy!

Feijoa Cakes

FEIJOA CAKES

Hello again - long time no write! Well, I have been super busy, and I do have a few goodies to post, so I am back at the keyboard again. Okay, first off, my North American family & friends are going to be looking at this sideways asking, "what in tarnation is a feijoa?"...my Kiwi mates will be asking, "what is tarnation?" Hehe - anyway, here is the low down on the feijoa. They are everywhere right now and yet the groceries want nearly ten bucks a kilo for them right now - luckily, we knew someone with a fertile tree willing to share their spoils (no, not their spoiled!). The feijoa is also known at a Pineapple Guava or a Guavasteen (soft inside like mangosteens) and originated in South America (Brazil, Columbia, Argentina, etc.). The fruit pulp is a little gritty (a bit like guavas or like some pears can be) and they are sweet and tangy with an almost floral aroma of ester (methyl benzoate). Very tropical tasting in my humble opinion. The skin isn't really edible...or if you do eat it I suspect it wouldn't be very pleasant. Normally, people here cut them in half and eat the flesh inside with a spoon. However, the feijoa is also popularly sold and consumed in smoothies, baked goods and in chutneys (chutneys are like heavily spiced sort of chunky fruit and onion salsas or jams). That's about it for the educational portion of this post. Now on to the really cool stuff - baking feijoa cakes. If you are able to buy guavas in your local markets, then there is a distinct possibility that you could also find feijoas there too. They are cultivated in California and Louisiana among other areas of North America and, of course, they are everywhere right now in Australia and New Zealand. Now...into the kitchen, yes?... INGREDIENTS: ½ Cup Milk 2 Eggs 1 ¼ Cups White Sugar 1 ½ Cups Feijoas, peeled & mashed 1 Tsp Vanilla Essence/Extract 75 Gms (~5 Tbsp) Butter, softened 2 Cups Flour 1 Tsp Baking Powder 1 Tsp Baking Soda ½ Tsp Salt ½ Tsp Cinnamon DIRECTIONS: In a large bowl, combine the Milk, Eggs, Sugar, Feijoas, Vanilla and butter, then blend together with an immersion/stick blender (alternatively, use a food processor) until you have a smooth mixture. Set aside the fruit mixture, and in a second bowl, sift together the flour, baking powder, baking soda, salt and cinnamon. Now fold the dry ingredients into the fruit mixture about a cup at a time until all of it is well incorporated. You will have a thick and smooth batter. Scoop/pour the batter into a lined muffin tin or a greased/paper-lined 20cm cake tin. For muffins/cupcakes bake at 180°C for about 17 minutes or for a full-sized cake about 40 minutes. These cakes need no toppings, as the feijoa essence is very delicate, but a light and creamy, slightly flavoured vanilla and lemon icing is nice. It’s also good with plain unflavoured yogurt or a cream cheese frosting. I made a basic butter cream frosting with a few drops of vanilla essence and a few drops of lemon essence and it was yummy, but the feijoa can get lost with too much...you can still taste feijoa, but it’s no longer the “star of the show”.

Choose your own preference and enjoy!

TAPIOCA PUDDING
Dad’s Double Batch


Well, it’s Queen’s Birthday weekend and it appears the only folks working today are in retail. That’s right...one more Kiwi holiday to add to the (seemingly never-ending) list. Don’t get me wrong, it’s nice to have one more day with my family at home, and a short week at that, so I am not really complaining.

This recipe is a family favourite as far back as I can remember. My Dad always made double batches because it never lasted more than 24 hours (if even that long). Mom sometimes made peach cobbler to eat with it and we almost never waited until it was properly chilled before devouring it. I must admit though, I did have to ask Mom & Dad to send me some of the Minute Tapioca (made by Kraft), as the tapioca “down under” appears to be very large pearls akin to Sago (assuming there is truly a difference between sago and tapioca). The pearls here resemble the “bubbles” in Thai desserts and “bubble teas”.

In any case, this is a luxurious treat that certainly reminds me of home. I hope you enjoy it as well.

INGREDIENTS:

3 Eggs, separated
12 Tbsp Sugar (or half sugar, half Equal/Splenda)
6 Rounded Tbsp Minute Tapioca (small pearls)
4 Cups Milk
2 Tsp Vanilla


DIRECTIONS:

First, mix the t
apioca, ½ of the sugar, milk, and egg yolks in a saucepan (do not use aluminum unless it is non-stick, make sure it is large enough as the mixture will increase in volume at the boil).

Next allow this mixture stand for 5-6 minutes and, whist waiting, beat the egg whites until stiff – slowly adding the remaining sugar.

Now place the tapioca mix over medium heat and stir constantly (trying to prevent sticking). Don't allow it to burn, but if it should burn a little be sure not to scrape it when you pour it out.

As it comes to a full boil it should start to thicken and rise. This thickening should take less than a minute after it boils.

Remove it from the heat and and pour just a little into the egg whites and stir in to temper them. Not too much or they will cook.

Whilst stirring, slowly fold the remaining mixture into the egg whites then, when fully incorporated, add the vanilla.

At this stage you can serve, cover and chill in individual servings if you have nice dishes to serve it in, otherwise, try to chill it in a large wide bowl for quicker temperature change.

I love this with peaches or strawberries, but just about any fruit with tapioca is a real treat!

Enjoy!


FRENCH ONION SOUP
Serves 4


This delicious recipe is one I adapted from one of my Dad’s family favourite dishes. He always made it with Gouda cheese and so this is how I like to make mine. Traditionally, I think Gruyere is the cheese used in most French Onion Soups, but I imagine a mix of these two might even be a nice option. Gruyere is a milder Swiss-style cheese on the slightly sweet & nutty side, whereas Gouda is a tangier and slightly drier/firmer cousin. Either way, choose what you prefer. I found some lovely Gouda this weekend at the Wellington Food Show, so we sampled it on our soup tonight! Mmmmm.... Wish my folks were here already to share in this one with us!

Despite the fact that this is “just a bowl of soup”...and a clear broth-like soup at that, it is actually quite filling. I was prepared to make some venison sausages or a veggie gratin type casserole to “help fill in the gaps” but, as fate would have it, this was our hockey practice and gymnastics day and I ran out of time. It was a good thing too – we were all quite well satisfied after polishing off this lovely rich meal.

Here we go...


INGREDIENTS:

5 Tbsp Butter
4-5 Med Onions (sweet onions, if you can get them), thinly sliced
½ Tsp Salt
2 Tsp Sugar
2 Cups Water
2 Cups Beef Jus, Stock, or Consommé
½ Tsp Thyme
2 Bay Leaves
2 Tbsp of Sherry Wine
2 Tbsp Cider Vinegar
1 Small Handful Parsley, finely chopped
*Sourdough or French Bread, 2 cm thick slices
*Gouda and/or Gruyere Cheese, thinly sliced or grated

*Amounts vary to individual tastes.


DIRECTIONS:

In a large stock pot, heat butter and sauté onions with salt and sugar over medium heat until they caramelize and begin to go golden brown.

Next, add water, jus/stock/consommé, thyme, bay leaves, sherry and vinegar before bringing this to a boil.

Reduce the heat and allow this to simmer over low-med heat for about 30 minutes (toss in the parsley after you turn the heat off and give it a good stir).

Whilst the pot is still simmering, toast a few slices of bread for the soup topping. One modification I have made, is that I cut the toast into bite-sized pieces to make it easier fit across the entire top of the dish and to make it easier to eat with molten hot cheese on top.

Now, spoon soup evenly into ovenproof bowls, adding the toasted bread on top (pushing it slightly into the soup).

Next, add cheese slices/sprinkle cheese over the toast to cover the tops of the soup bowls, then place them onto a baking tray.

Now you need to place the tray of filled soup bowls under the grill/broiler (med-high heat) to melt & brown the cheese for about 5 minutes or so or, until the cheese on top is bubbly and golden brown.

Serve immediately, with caution, as the soup bowls will be very hot.


Bon appetite!


AMERICAN BROWNIES


One thing I have noticed here in New Zealand is that there is a huge cafe culture. Unfortunately though, in my opinion, there are too many cafes and not enough fresh and tasty menu items. Many of the almost innumerable number of cakes, slices, tarts, and biscuits are quite dry, floury, and under flavoured. The names sound great; poppy seed lemon cake, raspberry tartlets, and even brownies. How can you get brownies wrong??? Well, most of them do! As a matter of fact, I have yet to taste a decent brownie down under that didn’t come from my kitchen (or my neighbour's). How’s that for modesty, eh? Hehe...

Brownies are one of those really quick & easy treats, but yet somehow they either skimp on ingredients or try to “make it their own” and manage to truly kill the essence of what a brownie is supposed to be. Brownies should be almost crunchy on the outside, but very moist and nearly chewy inside. They can be made with or without nuts, chocolate chips, or marshmallows, but the key is that they CANNOT be dry and crumbly – dry and crumbly NOT a brownie make, folks! There are even caramel or peanut butter swirl brownies that are incredible and so easy to make really.

So, in the interest of offering a truly lovely chocolate treat that can be modified in any number of ways dependent on one’s tastes...I give you here, the authentic/unadulterated American Brownie!


INGREDIENTS:

*1 Tbsp Flour
*1 Tbsp Coca Powder
¼ Cup Butter
6 Tbsp Cocoa (unsweetened baking cocoa powder)
1 Cup Sugar
2 Eggs
1 Tsp Vanilla
1/3 Cup Flour
¼ Tsp Salt
**Roughly 1 Cup of nuts or other additives, optional
*Mix together to dust the baking dish
**Amounts vary to individual tastes.


DIRECTIONS:

Preheat the oven to about 160°C (325°F).

Spray cooking oil on a small shallow baking dish (approx 6 x 10 inch or so – small casserole dish) and dust the bottom and sides with a combination of a Tbsp each of flour and cocoa powder (mixed).

Melt the butter and combine it well with the remaining cocoa powder in a medium bowl.

Now, add the sugar, eggs, vanilla, remaining flour and the salt and combine together well. The batter will be quite thick – this is perfect!

This is the stage where you add in the nuts, chocolate chips, or whatever you want in your brownies. Traditionally Americans usually go for walnuts, peanuts, or more chocolate! Personally, I like mine plain or maybe with pistachios or peanuts.

Next, pour the batter into the baking dish (as evenly as possible – but don’t try to smooth it as the batter will spread and even out on it's own). The brownies should not be too deep as the middle will "puff up" and it will take longer to cook...about 1.5-2 cm is about how deep the batter should end up - we aren't making chocolate cake here.


Cook for about 35 minutes or until a toothpick/skewer comes out clean.

We like to serve them slightly warm with vanilla ice cream on top...or just eat them as they are.

Enjoy!


FETA CHEESE SOUFFLÉ


A few days ago I decided to try something totally new for me – soufflés. I had never tried them before, but I can certainly see how one could get carried away experimenting with them. They are a bit rich, but very light and just the right tangy cheese flavour to satisfy... I have to say too, that these were much easier to make than I had originally anticipated. They took about 35 minutes, more or less, from start to finish.

I recently saw an episode of Iron Chef America where the secret ingredient was ham...the challenger made a twice baked ham soufflé and it looked REALLY good. My soufflés aren’t quite that sophisticated or fancy, and they are only once-baked, but they were quite tasty. I didn’t need my "Plan B" after all! Hehe.

My own humble opinion of this particular recipe is that the pepper and the cheese in the soufflé were really complimented well by the creamed spinach sauce that I made for a side. This was inspired by a tiny cookbook “The Fast Egg” that I recently acquired from a local book shop. I thought it might have some interesting new ideas and I was in need of a bit of inspiration lately.

Anyway, now that I have the gist of it, I think I can come up with a few new flavour combinations to impress lunch or dinner guests in the future. So long as the experimental creations turn out as nicely as these did, I will be more than happy. So...watch this space for future soufflé ideas.


INGREDIENTS:

Cooking Oil Spray
¼ Cup Bread Crumbs
30 Gm (2 Tbsp) Butter
2 Tbsp Flour
1 Cup Milk
4 Eggs, separated
¼ Tsp Cayenne Pepper
150 Firm Feta Cheese, crumbled


DIRECTIONS:

First, preheat the oven to 200° C/400° F.

Next, spray your soufflé dishes (6 one-cup capacity dishes or 3 two-cup capacity dishes or mugs), with cooking spray and coat in bread crumbs then place them onto a cooking tray.

Make a roux by melting your butter in a small saucepan and adding the flour to cook for a minute or so.

Once the roux paste is ready, add the milk and bring to a gentle boil just briefly and remove it from the heat once it has thickened.

Pour this hot mixture into a large bowl and quickly stir in the egg yolks (barely beaten), the pepper, and the cheese – allowing it to cool for approximately 5 minutes.

Meanwhile, beat the egg whites until soft peaks form. (You can add a tiny amount of cream of tartar or white vinegar to stabilize the whites if you wish).

Next, you gently fold the whites into the yolks mixture in two batches.

Now, divide the mixture amongst your prepared soufflé dishes and bake about 15 minutes or until they are puffed and lightly browned on the tops.

I served mine with a creamed spinach sauce that was a fantastic compliment to the slightly spicy and cheesy soufflés.

Here’s how:


INGREDIENTS:

1 Cup Baby Spinach Leaves, wilted (steamed, boiled, micro waved, etc.)
(Alternatively, thaw out a half cup or so of frozen spinach)
⅔ Cup Cream or Evaporated Milk
*Salt

*Amounts vary to individual tastes


DIRECTIONS:

To make a quick creamed spinach sauce, just steam a good bunch of fresh leaves or thaw out a portion of frozen spinach so that you have about a half to a cup of wilted leaves, give or take.

Blend or otherwise puree the leaves whilst slowly adding the cream/milk and return this mixture to heat in a small saucepan. Add a bit of water or regular milk if the consistency is too thick for your liking.

Heat until warmed through and salt to taste.

Bon appetite!

REESES PIECES COOKIES


One flavour from home that I sometimes miss down here in Kiwiland is the Reeses brand peanut butter flavoured treats. I have found though, that both the Reeses Pieces and the Peanut Butter Cups (chocolate covered peanut butter) are both available at Kmart and sometimes at Woolworths. Yes, I do check out the local Kmart once in a while...it is one of the few places I can find certain American items that I like.

The Kiwis and Aussies are always commenting on the American love affair with peanut butter and even my loving husband cannot bring himself to eat it with jam (jelly to my American mates). When they see TV programs talking about the "peanut butter and jelly sandwich" they literally cringe...I can actually understand that one now, because "jelly" here is "Jell-O" to us 'Yankee Doodles'. Yes, I am referring to the gelatanous quivery, wiggly, jiggly, semi-solid food stuff that I never could stand the texture of in my mouth. Luckily, our daughter doesn't care much for it either, so I am pardoned from having to make any of the horrible concoction myself!

This cookie/biscuit recipe is loosely based on the Mrs. Fields chocolate chip recipe (from the good ‘ole homeland) with a few little adjustments to suit the Kiwi kitchen. I assisted my daughter in making this batch, so I will give her the credit for this post. ;o)

Here we go...


INGREDIENTS:

2½ Cups Flour
½ Tsp Baking Soda
¼ Tsp Salt
1 Cup Brown Sugar, firmly packed
½ Cup Molasses
1 Cup Butter, softened
2 Eggs
2 Tsp Vanilla Essence/Extract
2 Cups Reeses Pieces Candy


DIRECTIONS:

Preheat the oven to 150° F/300° C.

First, combine the flour, soda, and salt in a medium bowl.

Next, cream the sugars, molasses and butter together in a large bowl. Blend these together until it forms a thick and grainy paste.

Now, add the eggs and vanilla to the creamed sugar mixture. Blend well with an electric mixer until it starts to get fluffy.

Slowly add about a half cup to a cup at a time of the flour mixture into the wet mixture and thoroughly combine before adding the Reeses Pieces. Be careful not to overmix.

Once the cookie dough is ready, drop rounded spoonfuls onto a silicone baking mat or non-stick baking tray about 2 inches apart from each other and bake for about 20-25 minutes until golden brown.

Once cooked, transfer them immediately to a cooling rack or other cool surface for a few minutes before tucking in.

Enjoy!

PIEROGIES
(MADE WITH POTATO, ONION, CHEESE AND PORK)


So, some of you might be thinking, “What the heck is a pierogi?”, well, I guess I like to describe it as a Polish dumpling something akin to raviolis...large raviolis.

When I was in high school, my friend’s dad used to make these and, later on I would buy frozen ones (not this good though) when they were available through
Schwanns if they came through my neighbourhood in California or Oregon. I could also sometimes find them in grocery store frozen sections, but they would usually be disappointingly lacking in flavour.

Traditionally, I believe the most popular type of pierogi is simply mashed potato, cheese and sautéed onion. I like mine a little more substantial, so I usually add minced beef or pork and mushrooms (if I can get away with it, as my daughter has not yet learnt to appreciate them). These dumplings are usually served with a side of sour cream and a serving of some sort of veggie. Pierogies are great as a snack or as a meal and you can make them pretty much any size you like. These little beauties can also be refrigerated (uncooked) for several days or, frozen for up to several months.

If you make the dough ahead of time, the rest sort of falls into pace and really takes about the same amount of time as any other dinner might. The pierogies can be eaten as they are after boiling them or, fry or bake them afterward to give them a lovely crispy crunch. Whichever preparation you prefer, these will be a nice treat.


DOUGH ~ INGREDIENTS:

2 Cups Flour, plus extra for kneading and rolling dough
½ Tsp Salt
1 Lg Egg
½ Cup Sour Cream, plus extra to serve with the pierogi
¼ Cup Butter, softened (or oil)
1 Tbsp Butter

DIRECTIONS:

To prepare the pierogi dough, mix the flour and salt in a medium bowl.

Next, beat the egg in a separate bowl or mug and then add it to the flour mixture.

Now, add the sour cream and the softened butter and combine well. If the dough is too dry, add a tablespoon or so of water (I used the water reserved from boiling the potatoes).

You will need to work the dough approximately 5-7 minutes, or until it is no longer overly sticky – adding spoonfuls of additional flour one at a time, if needed (I don’t usually need to).

Wrap the dough in cling wrap and refrigerate it for a minimum of 20-30 minutes (overnight is good); the dough can be kept in the refrigerator for up to 2 days.


FILLING ~ INGREDIENTS:

1-2 Tbsp Butter
2 Med Onions, finely chopped
2 Cloves Garlic, crushed
4 Lg Potatoes, boiled and mashed
500 Gm (1 Lb) Pork Mince (Ground Pork)
*Salt & Pepper
1 Cup Colby Cheese, grated (just about any cheese works in these)

*Amounts vary to individual tastes.

DIRECTIONS:


First, heat the butter in a large pan and sauté the onions in it until they begin to soften then add the garlic, continuing to cook until the onions become clear.

Set aside the onions and cook the pork, seasoning with salt and pepper and cooking until the meat is cooked through.

Lastly, add in the onions, mashed potatoes and cheese and mix well before setting the filling mixture aside to cool.


ASSEMBLING THE PIEROGIES:

First, roll the pierogi dough on a floured surface until about ¼ inch thick, or thinner (like a ravioli).

Next, cut ovals or circles of dough (similar in size to a CD). Use whatever you are comfortable with – cookie cutter, drinking glass, Tupperware lid, or just use a knife. You may opt to make larger or smaller pierogies, if you wish.

Afer tasting the filling for seasoning, place a small amount of filling (roughly 1-2 tablespoons or so, depending on the size you cut the dough into) onto each piece of pierogi wrapping and fold it over, forming sort of a semi-circle, pressing the edges together and pinching with your fingers or with the tines of a fork. If the edges do not stick together well, slightly moisten them with water and try again. I don’t have trouble unless I get the filling mashed into the seal. :o)

A few at a time, cook the pierogies in a large pot of boiling water. They will be done when they float to the top (about 8-10 minutes). Rinse in cool water and allow to dry – I lay them out n a baking rack over a baking sheet and they dry pretty quickly.


Next, sauté a bit of chopped onion in butter (to season the pan) until the onions are soft, before adding the pierogies and pan frying them until they are lightly crispy. Alternatively, you can put the butter and onions onto a baking sheet to crisp them in the oven instead (about 180° C for 8-10 minutes).

We love pierogies and hope you will too.

ENJOY!


MELON GRANITAS
(Diabetes Friendly and Gluten Free)


I finally received my first Foodtown magazine (yea!) and I found the perfect summer treat to start off in there. It has been very hot here lately...great for swimming and beach play, but not so great for culinary creativity. Anyway, when I saw this recipe I went out to buy my rock melon (aka cantaloupe) and honeydew immediately...I even bought a watermelon for good measure.

One thing to note too is that this particular publication actually provides the nutrition info (Joie, you might like this!). These granitas are just 584 Kilojoules (139 Calories) and 0.1 Gms of fat (remember this info will vary slightly according to the fruit you choose to use). The magazine claims these are diabetes friendly and gluten free as well, for anyone keeping tabs on that.

Now, Dad always chilled melons for us before we had the opportunity to taste them and I must say that they always tasted (and smelled) nicer when they were really, really cold as opposed to the lukewarm versions in restaurant fruit salads so, into the fridge mine all went.

What is a granita, you might ask? Well, imagine a snow cone or shaved ice treat made primarily out of fruit puree rather than plain unflavoured ice and syrup. That’s basically what we have here. Granitas have more flavour because the majority of the ice is actually frozen pulp rather than water.

With this particular recipe, the colder your ingredients are, the faster it will eventually freeze and therefore the sooner you may devour them...and you will! This is just a basic granita recipe but you can pretty much use any fruit you like…whatever happens to be in season…but melons are particularly refreshing, especially after a nice meal. Some people opt to pour liqueurs or spirits over them (pineapple flavoured rum, Malibu, or midori, for example) sort of margarita or daiquiri style, but we like them just like this!

Here you go…


INGREDIENTS:

2 Cups of Melon/Fruit Chunks
1½ Tbsp Lime or Lemon Juice
1½ Cups Water
½ Cup Sugar


DIRECTIONS:

Heat the sugar & water together in a saucepan until the sugar is completely dissolved, then put it aside to cool.

Puree the fruit & juice together, then pour in the syrup and pulse the blender a few times to combine everything well.

Pour it into a shallow airtight container & freeze.

After a few hours, mix it all up with a metal fork and scrape any ice crystals off the sides and bottom to mix back into the middle. Repeat every couple of hours until it's well frozen.

Now, when ready to eat, scrape it into a pile of ice bits with a metal fork and scoop it into a glass or bowl and eat it! It's like a fruity snow cone or shaved ice, but way healthier!!!

YUMMO!

SPICED PORK PITAS


I have been busy lately with both work and a bit of family fun. We are experiencing a really glorious summer this year and, as you do, we are trying to take advantage of it as much as possible.

In an effort to eat healthy and keep meals interesting, we have been using the outdoor grill a lot and eating more fresh produce. However, the other night I didn’t feel much like BBQ…again…so, I decided to whip up some tasty pitas that really hit the spot. I spiced my pork in a somewhat sausage-like way and it was lovely. I also accompanied it with a light and tangy yogurt dressing that gave it a little kick, just the way we like it.


MEAT - INGREDIENTS:

500 Gms (1 Lb) Pork Mince (Ground Pork)
1 Med Yellow Onion, finely diced
½ Tsp Sage
1 Tsp Celery Salt
½ Tsp White Pepper
1 Tsp Cracked Red Pepper Flakes
½ Tsp Marjoram
1 Tsp Parsley
¼ Tsp Mace
1 ½ Tsp Caraway Seeds
1 Splash of Red Wine

PITA - INGREDIENTS:

1 Pkg Good Pita Bread
1 Carrot, grated
1 Courgette (Zucchini), grated
¾ Cup Low-fat Natural (unflavoured) Yogurt
½ Tsp Garlic Powder or Garlic Oil
1 Tsp Dill Tips


DIRECTIONS:

In true “sausage” or “meatloaf” style, combine all of the above “meat” ingredients in a bowl and mush it around until everything is well combined.

Once everything is mixed well, heat a large frying pan with about 1 Tbsp of oil and begin frying off the spiced meat and onion.

Cook the meat until it is cooked through and browned a bit.

Remove the mixture from the heat and prepare your sandwiches by cutting the bread in half and opening the pockets.

Next, insert some of the grated veg into each pocket, followed by the meat.

Now drizzle each with a bit of dressing and/or serve a small dish of dressing on the side.

These are also great with a little cheese and/or tomato, cucumber and mild peppers.

Enjoy!

RICE BUBBLE AND DATE TREATS
(aka RICE BUBBLE & DATE SLICE)


I believe it was Christmas Eve and I was next door for morning tea when Linda offered me a goodie from a plate of sinful options. My first taste was of a rice bubble slice (rice crispie treat) that Keri had made. Now, I have always been fond of the many crispie treats made with this cereal…the standard made with butter and marshmallow crème, the peanut butter varieties (with and without chocolate chips) and of course the cocoa version…but this one was even better than all of those combined (yes, honestly) so I just had to add this to my personal cookbook/recipe collection. I will admit though, that if I had known prior to tasting it that dates were a primary ingredient, I may have opted to try something else instead, as I am not usually one to go for dried fruits. I was VERY impressed, as you can see.

After having Keri write the recipe down for me, I stashed it away in my special recipe collection for the right opportunity to make it. These are a perfect snack to go with a cold glass of milk or even coffee or tea. They are quite sweet, but also flavourful because of the fruit content…beautiful!!!

This weekend we are attending a barbecue with some friends and, of course, wanted to bring something. Well, The host and hostess seem to have all of the main stuff taken care of (bbq meats, salads, devilled eggs, and even a few dessert options already), so I thought this was a perfect opportunity to share samples of Keri’s recipe.

One observation to note, is that in the beginning you start out with a pale yellow mixture. By the time this mixture is cooked and ready to remove from the heat, the colour has changed to a caramel brown and will have become very thick and gooey.

The flavour is sort of a caramel/butter toffee type of thing and the dates really just fall apart, so there is no need to chop them up ahead of time unless you REALLY want to!

Here’s how to make THE BEST rice bubble/rice crispie treats around!!!


INGREDIENTS:

1½ Cups Sugar
200 Gms (7oz) Butter
2 Eggs
2 Tsp Vanilla
1 Pinch Salt
3 Cups Whole Pitted Dates
6 Cups Ricies (Rice Crispies/Rice Bubbles)


DIRECTIONS:

In a large pot, whisk the sugar and eggs together then, continue stirring over medium heat.

Add the butter and stir with a wooden spoon until well blended and the butter is fully melted and incorporated into the sugar and egg mixture.

Next, add the vanilla and salt and, when those are well incorporated, add the dates. The dates will automatically break down in the cooking process so no chopping is really necessary unless you prefer to cut them up first.


Now bring the mixture to a boil and simmer, stirring constantly, until thick & brown. Watch it carefully to prevent sticking and/or burning.

Cool the mixture for 5-10 minutes then add rice bubbles and mix until the rie bubbles are all well coated and everything is well combined.

Now, carefully tip out the mixture into a rectangle baking dish or aluminium tin about 13 x 9 inches or 30 x 25 centimetres.

Once completely cooled, cut into squares and it’s ready to eat.

This is especially sweet too, so have a glass of milk at the ready! This is quite a tasty snack and it is inexpensive to make. The squares are great for sharing at a party or taking to a friend’s place in exchange for a cup of tea. This is especially good for a quick & easy option for a school bring-along dish as well.

Cheers again Keri…


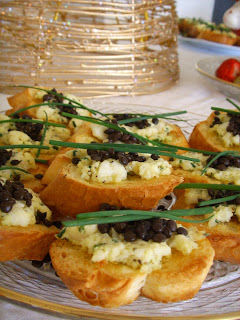
CROSTINI WITH CHIVES,
FETA & BELUGA LENTILS


This is only but one lovely way to enjoy the unique legume known as the beluga lentil. I suppose it could be referred to as a poor man’s caviar with its beautiful sheen and jet-black colouring. These little gems are tasty in pilafs, vegetarian or otherwise, as well as hors de’oeuvres. I found a bag of these little black beauties at my local wholesale market and thought they looked interesting so I would give it a go and see what I could do with them.

I did a little research and discovered that Beluga Lentils are names for their caviar-like appearance in the fact that they remain whole and unbroken once cooked properly and maintain a shiny appearance, much like beluga caviar. I have only tasted caviar on two occasions and I still don’t understand what all of the fuss is about. To me it is just a VERY salty and VERY fishy condiment that really has no business in my kitchen. These little impersonators, on the other hand, are quite tasty and just as elegant to work with.

Combine these lovely legumes with cheese, chives and a garlic crostini and you have a winning combo, for certain.

I was recently asked to cater for a friend’s medi-spa,
Beautyworx, as she was having a holiday demo night for her preferred clients. I was happy to oblige and anxious to try a couple of new nibble recipes I had recently discovered in this food blogosphere.


Along with these crostinis, I also made up some cucumber boats with herbed cream cheese, basil leaves and grape tomatoes, a fruit skewer porcupine with white chocolate truffle dipped strawberries, baby-banoffi-bites with a rich chocolate ganache to hold the crusts firmly in place, and my own twist on a Kiwi favourite – the brandy snap (with a bit of kahlua in the whipped creamy filling).

In any case, here is my favourite recipe from that evening and it was truly a hit! Not a crumb was left to be seen…or eaten!

INGREDIENTS:

1 French Stick (baguette)
200 Gm (about 8 oz) Good Feta Cheese
2 Tbsp Cream Cheese, softened
1 Tsp (more or less) Freshly Cracked Pepper
¼ Cup Freshly Chopped Chives
3-4 Cloves Garlic, peeled & halved
* Good Quality Extra Virgin Olive Oil
¼ Cup Beluga Lentils, cooked in stock

* Amounts vary to individual tastes.


DIRECTIONS:

I pre-boiled my lentils in about 2 cups chicken stock for about 40 minutes, until tender, but you can use whatever stock you like or even just boil them in salted water, careful not to overcook them and end up with a mushy mess.

Preheat the oven to about 180 degrees C / 350 F.

Diagonally slice the baguette into 1 cm thick pieces and rub each on both sides with garlic.

Next, brush each side of the bread pieces with oil and arrange in a single layer on a baking sheet for toasting.

Toast each side between 6-8 minutes until golden brown and crispy.

Whilst the bread is toasting, mix the feta cheese and the soft cream cheese (cream cheese is to bind and keep the topping from falling off of the crostini).

Now add in the cracked pepper and chives and drizzle in some olive oil. The oil is to help incorporate all of the herb flavour and keep the cheese moist. It also tastes incredible.

All that is left now, is to top your crostinis and to share and enjoy!

There are two good ways to use the lentils. You can start topping the crostinis with the cheese mixture and then a small scoop of lentils on the top of the cheese or, you can mix in some lentils with the cheese and top the crostinis with the blended mixture.

I opted for the former then garnished with chives to give them a bit more of an elegant presentation for my friend’s party, but I mixed the lentils in another batch at home afterwards for the family and both ways are VERY tasty!

Best wishes to all of my friends and family for a healthy, happy and prosperous new year.

Cheers!


CREME DE MENTHE
DARK CHOCOLATE TRUFFLES
Makes about 30 truffles


I suppose I was feeling a bit adventurous this year, so I decided to try my hand at truffles. Not just any truffles, mind you, but my favourites with lots of peppermint! I used my own homemade creme de menthe (one for me, two for the pot) and a bit of extra peppermint extract to make them more aromatic and to allow the mint to penetrate the very rich dark chocolate.

They turned out wonderfully and they just melted in your mouth. I ended up giving most of them away as gifts (self-preservation) but did enjoy just a couple myself. They are really quite simple to make (although messy as all heck) so, perhaps I'll experiment with other flavours...I still have plenty homemade kahlua in the pantry alongside the creme de menthe, hmmmmm....

INGREDIENTS:

1 Cup Cream
½ Cup Creme De Menthe
(and/or optional peppermint extract - depending on how strong you like them)
250 Gm Dark Chocolate (at least 72% Cocoa), broken into small pieces.
¼ Cup Unsalted Butter
*Cocoa Powder for rolling truffles at the end
* Amount will vary with each batch.


DIRECTIONS:

First, break or cut the chocolate into small peices and put them into a medium heat resistant bowl and set aside.

Next, heat the cream and creme de menthe (and/or peppermint extract) and bring to a boil.

Remove the mixture from the heat and immediately pour the hot liquid over the chocolate and stir carefully until the chocolate is completely melted and the mixture becomes a creamy and smooth ganache.

Now, add the butter and mix again until well combined before pouring the entire contents into a glass dish to cool in the refrigerator.

Refrigerate for 2 hours minimum – overnight preferred.

When the compound is hard but malleable, use a melon-baller or two teaspoons to form a small quinelle of ganache, roll them between (gloved) hands into a small ball, and then roll them in the cocoa powder.

The ganache will tend to melt as soon as you touch it, so don't roll them too long. Laytex gloves work well to assist in rolling truffles as they keep the mess localized and you don't need to keep rinsing hands in between balls. Adding some cocoa powder to your palms before rolling the quinelles into balls also helps, somewhat, to keep the chocolate from sticking to everything.
Set the truffles aside to chill in a sealed container when all of the truffles are done.

Sprinkle with cocoa powder and/or icing sugar (powdered/confectioners' sugar) then chill until 1 hour prior to serving.

To fully appreciate the flavour and consistency, they are best served at room temperature.

ENJOY!


FRESH NZ CRAYFISH SALAD
(aka Spiny Rock Lobster to those in North America)


First, I need to share a little story.

Just after arriving in NZ over 3 years ago now, my husband took me over to meet one of his many sisters and her hubby. We arrived just before her husband and his boat, as he had just returned from a dive with several huge creatures nearly as big as our daughter! I was then asked if I liked crayfish or scallops, to which I promptly replied, “uhm, not crayfish, but scallops are nice…I do like lobster though.”

I didn’t understand at the time why they might ask me about crayfish when we were looking at enormous lobsters (sans front claws though) here and, where I grew up, crayfish were smallish muddy horrible things that weren’t worth all of the effort to catch, soak in clear water overnight, clean and cook just to get one bite of meat from each of the little beasts.

So, we carried on with our visit and I think we even went home with some lovely NZ scallops (also quite huge and attached to some funny orange bit – more on that later). It wasn’t until later that evening at home when I realized in talking to my husband, that we could have probably taken one of those huge lobsters home if I hadn’t said I didn’t eat crayfish! What – you actually call those gigantic granddaddy lobsters crayfish???

Well, it’s been an ongoing joke ever since…Tiff “blew her chips” (meaning lost her chances) to get any fresh crayfish from now on.

Now, fast-forward to this weekend and my brother & sister-in-laws were on their way to visit another sibling nearby and popped by on their way to drop off a crayster – or lobsfish…you know what I mean… It was a great surprise and just in time for lunch – YUM!
(THANK YOU VERY MUCH!)


I basically borrowed a slightly modified version of a friend’s cauliflower recipe over at
Cooking Dunkin Style and topped the creamy, cheesy cauliflower with the diced up crayfish meat. What a treat! I usually eat lobster with the traditional clarified butter, but I have learned to do things a bit differently here.

So, in a nutshell, here is one more nice way to have lobster/crayfish!


INGREDIENTS:

Cauliflower
Mayonnaise (Best Foods/Hellmans)
Milk
Diced Onion
Grated Tasty/Cheddar Cheese
Crayfish
Salt & Pepper

All of the amounts are really up to the individual, so just go with what works for you.

DIRECTIONS:

The crayfish was boiled and chilled in advance, so all I really needed to do was crack that baby open and carefully pull out all of the meat, then dice it up and set it aside.

I cut up the cauliflower into bite-sized pieces next and put them all into a microwave-safe glass dish.

Next, I put a couple of good dollops of mayo into a jug and added just enough milk to make it easy to pour over the cauliflower.

After that, I sprinkled diced onions evenly over the top and covered the whole thing with grated cheese.

To cook it, I placed baking paper over the top and nuked it in the microwave until the cauliflower was tender and the cheese was melted and beginning to brown (about 5-7 minutes).

To serve it, I just mixed up the cauliflower and scooped some into a bowl then topped it off with the crayfish meat and a bit of salt & pepper.
Couldn’t be easier, really…or more tasty.

Thank goodness that our daughter has not yet developed a fondness for crayfish, as it is currently about $100 NZD per kilo (2.2 Lbs)…that is approximately $50 per pound…or, $25-30 per pound in US dollars! :o) Doesn’t sound so bad that way, does it? LOL