About Me

My photo
Emigrated from America to New Zealand and never looked back. Couldn't have asked for a better husband, family & life!

MELON GRANITAS
(Diabetes Friendly and Gluten Free)


I finally received my first Foodtown magazine (yea!) and I found the perfect summer treat to start off in there. It has been very hot here lately...great for swimming and beach play, but not so great for culinary creativity. Anyway, when I saw this recipe I went out to buy my rock melon (aka cantaloupe) and honeydew immediately...I even bought a watermelon for good measure.

One thing to note too is that this particular publication actually provides the nutrition info (Joie, you might like this!). These granitas are just 584 Kilojoules (139 Calories) and 0.1 Gms of fat (remember this info will vary slightly according to the fruit you choose to use). The magazine claims these are diabetes friendly and gluten free as well, for anyone keeping tabs on that.

Now, Dad always chilled melons for us before we had the opportunity to taste them and I must say that they always tasted (and smelled) nicer when they were really, really cold as opposed to the lukewarm versions in restaurant fruit salads so, into the fridge mine all went.

What is a granita, you might ask? Well, imagine a snow cone or shaved ice treat made primarily out of fruit puree rather than plain unflavoured ice and syrup. That’s basically what we have here. Granitas have more flavour because the majority of the ice is actually frozen pulp rather than water.

With this particular recipe, the colder your ingredients are, the faster it will eventually freeze and therefore the sooner you may devour them...and you will! This is just a basic granita recipe but you can pretty much use any fruit you like…whatever happens to be in season…but melons are particularly refreshing, especially after a nice meal. Some people opt to pour liqueurs or spirits over them (pineapple flavoured rum, Malibu, or midori, for example) sort of margarita or daiquiri style, but we like them just like this!

Here you go…


INGREDIENTS:

2 Cups of Melon/Fruit Chunks
1½ Tbsp Lime or Lemon Juice
1½ Cups Water
½ Cup Sugar


DIRECTIONS:

Heat the sugar & water together in a saucepan until the sugar is completely dissolved, then put it aside to cool.

Puree the fruit & juice together, then pour in the syrup and pulse the blender a few times to combine everything well.

Pour it into a shallow airtight container & freeze.

After a few hours, mix it all up with a metal fork and scrape any ice crystals off the sides and bottom to mix back into the middle. Repeat every couple of hours until it's well frozen.

Now, when ready to eat, scrape it into a pile of ice bits with a metal fork and scoop it into a glass or bowl and eat it! It's like a fruity snow cone or shaved ice, but way healthier!!!

YUMMO!

HONIED CARROT AND SPICE BISCUITS


The weather “down-under” has been marvellous, but unfortunately the heat isn’t great for creative cooking inspiration. It just makes me lazy and I end up throwing together sort of interesting salads or just grilling everything on the BBQ. It makes for tasty light meals, but nothing too blog worthy really I'm afraid. I am working on some melon granitas and homemade ice cream today, so hopefully – with any luck – they will turn out as good as they sound and I will have some lovely summer treats coming up very soon.

This weekend was wild! I went sailing on Wellington Harbour with some friends and it was fantastic! It was a 8.2 metre keel boat (supposedly won’t tip over) and it was like being on a carnival ride with the boat deck being practically vertical half of the time. Now I am tossing up whether or not to take lessons at the local sailing academy. They are reasonably priced and in talking to experienced sailors it sounds like winter sailing is the best. I guess I need to see if it’s something I will have enough time for…

Anyway, this sweet recipe was a last-minute project I fooled around with the other night whilst craving something sweet and tasty, but sans chocolate. We had a massive chocolate overdose over the Christmas break and, unlike my hubby, I am ‘over it’ for a while! I have this old cookbook with 100 quick & easy cookie recipes in it, but I have noticed that sometimes a step or two is left out or the measurements aren’t quite right, so I had made a few notes that this one was okay, but needed a bit of help.

I started with the basic cookie recipe, but added vanilla and changed a few measurements to get this, the perfect cookie (or mini muffin). These do not come out hard or chewy really. This recipe yields a much softer almost cake-like biscuit that is very tasty indeed. Imagine an entire dish of the best part of the muffins – just the tops!

I hope you enjoy them!

INGREDIENTS:

1 Cup Sugar
300 Gms (½ Cup) Butter, softened
2 Eggs
¼ Cup Honey
2 Tsp Vanilla Essence (extract)
2½ Cups Flour
2½ Tsp Baking Powder
1 Tsp Pumpkin Pie Spice (Cinnamon, Ginger, Nutmeg, Allspice mixed together)
¼ Tsp Salt
1 Med-Lg Carrot, shredded


DIRECTIONS:

First, preheat oven to 160 C (325 F).

In a large bowl, cream the sugar and butter together until pale yellow and fluffy.

Next, add eggs, honey and vanilla and beat well.

In a separate bowl, sift together all dry ingredients and then slowly incorporate them into the sugar/butter mixture.

Mix until all of the ingredients are well combined then add the carrot and mix well again.

Now, with 2 spoons, shape the dough into approx 2-3cm (1-inch) balls and place them about 4 cm apart onto a silicone baking mat, or cookie sheet lined with baking paper.

Bake about 15-20 minutes or until the edges go slightly brown. Be careful not to overcook or they will be dry and possibly burnt on the bottoms.

Remove immediately and cool on a wire rack.

Voila - Perfectly delicious cake-like cookies.
This recipe makes about 4 dozen lovely biscuits or miniature muffins. If you prefer mini muffins, cook them longer – about 20-30 minutes or until a toothpick/skewer comes out clean.

SNOOTY MENUS

Like anyone else, I really enjoy a night out once in a while. I love good food and great company, but every now and then I see a particularly snooty menu and it irritates me. Today I received an invitation to a "winemakers lunch" along with the following menu that made me laugh...needless to say, it's a bit "over the top" for even me. At first, it all sounded very interesting...

The lunch includes:

  • A sumptuous five-course meal
  • 6 glasses of superb wines from the guest vineyard
  • Return transport from Central Wellington
  • Extreme Golf (10 balls per person)
  • Claybird shooting (10 shots per person)
  • Use of petanque and horseshoe throwing sets

Not too bad yet, right? They also provide transport so no one will drink & drive. So, I decide to have a look at the menu to see what is on offer...

Menu
~
Petit Brioche with Alaskan King Crab Fraiche
Abalone on Japanese Seaweed Salad
Served with Allan Scott Cecelia Reserve Brut
~
Whipped Goat Curd
on sweetcorn Parantha with mustard greens, melon and ginger salsa
Served with Allan Scott Millstone Organic Marlborough Sauvignon Blanc 2008
~
Spiced Pork Gyoza
with grilled scampi and an Asian herb salad with lime labne
Served with Allan Scott The Wallops Chardonnay 2007
~
Seared Ostrich Medallionon roast beetroot and shallot with
Vincotto olive pate, snail wontons and caramelised beer vinaigrette
Served with Allan Scott The Hounds Pinot Noir 2007
~
Roast Nectarine
With a pear, brandy and butterscotch sauce
with gorgonzola icecream and madelines
Served with Allan Scott Late Harvest Riesling 2007
~

Now, I will admit that some of these things sound interesting, but...whipped goat curd on parantha - can't they say goat cheese on indian flatbread? Or...how about the ostrich...the stuff is nearly flavourless on it's own, so why try to dress it up rather than serving duck or even quail (if you want to cook exotic fowl), at least they have flavour!!!

Now, the snail wontons - I mean, really? Yes, I have eaten snails as escargot and although I thought it was okay, it wasn't something I'd rush madly out to buy...would you? Again - flavourless except for the fat, herbs & garlic they are smothered in (usually).

Finally, we get to dessert, this has to be good, right??? Well, the fruit and sauce sound okay...I'll even take a madeline or two, but gorgonzola ice cream??? WHAT?! I detest blue vein cheeses at any given time, but to make an ice cream out of the vile stuff has to be a crime against all things right in the world or something, really!

So now I suppose that with three out of six courses featuring cheese of some variety or another, the seaweed, snails and fruit are supposed to be nature's laxatives to help push it all through, right?

Well, whatever the case, I think I'll give this one a miss. I would prefer the lunches on offer at , Willamette Valley Vineyards, where I know the menus will still be first class, but not overstated...much like their wines, I suppose. I know this because my Uncle is their winemaker as well as a first rate cook (as is my Aunt Maria).

Enough for this post...have a laugh and be thankful that most people, no matter what their class, status, or income, are not so snooty as this. LOL

Cheers!

SPICED PORK PITAS


I have been busy lately with both work and a bit of family fun. We are experiencing a really glorious summer this year and, as you do, we are trying to take advantage of it as much as possible.

In an effort to eat healthy and keep meals interesting, we have been using the outdoor grill a lot and eating more fresh produce. However, the other night I didn’t feel much like BBQ…again…so, I decided to whip up some tasty pitas that really hit the spot. I spiced my pork in a somewhat sausage-like way and it was lovely. I also accompanied it with a light and tangy yogurt dressing that gave it a little kick, just the way we like it.


MEAT - INGREDIENTS:

500 Gms (1 Lb) Pork Mince (Ground Pork)
1 Med Yellow Onion, finely diced
½ Tsp Sage
1 Tsp Celery Salt
½ Tsp White Pepper
1 Tsp Cracked Red Pepper Flakes
½ Tsp Marjoram
1 Tsp Parsley
¼ Tsp Mace
1 ½ Tsp Caraway Seeds
1 Splash of Red Wine

PITA - INGREDIENTS:

1 Pkg Good Pita Bread
1 Carrot, grated
1 Courgette (Zucchini), grated
¾ Cup Low-fat Natural (unflavoured) Yogurt
½ Tsp Garlic Powder or Garlic Oil
1 Tsp Dill Tips


DIRECTIONS:

In true “sausage” or “meatloaf” style, combine all of the above “meat” ingredients in a bowl and mush it around until everything is well combined.

Once everything is mixed well, heat a large frying pan with about 1 Tbsp of oil and begin frying off the spiced meat and onion.

Cook the meat until it is cooked through and browned a bit.

Remove the mixture from the heat and prepare your sandwiches by cutting the bread in half and opening the pockets.

Next, insert some of the grated veg into each pocket, followed by the meat.

Now drizzle each with a bit of dressing and/or serve a small dish of dressing on the side.

These are also great with a little cheese and/or tomato, cucumber and mild peppers.

Enjoy!

RICE BUBBLE AND DATE TREATS
(aka RICE BUBBLE & DATE SLICE)


I believe it was Christmas Eve and I was next door for morning tea when Linda offered me a goodie from a plate of sinful options. My first taste was of a rice bubble slice (rice crispie treat) that Keri had made. Now, I have always been fond of the many crispie treats made with this cereal…the standard made with butter and marshmallow crème, the peanut butter varieties (with and without chocolate chips) and of course the cocoa version…but this one was even better than all of those combined (yes, honestly) so I just had to add this to my personal cookbook/recipe collection. I will admit though, that if I had known prior to tasting it that dates were a primary ingredient, I may have opted to try something else instead, as I am not usually one to go for dried fruits. I was VERY impressed, as you can see.

After having Keri write the recipe down for me, I stashed it away in my special recipe collection for the right opportunity to make it. These are a perfect snack to go with a cold glass of milk or even coffee or tea. They are quite sweet, but also flavourful because of the fruit content…beautiful!!!

This weekend we are attending a barbecue with some friends and, of course, wanted to bring something. Well, The host and hostess seem to have all of the main stuff taken care of (bbq meats, salads, devilled eggs, and even a few dessert options already), so I thought this was a perfect opportunity to share samples of Keri’s recipe.

One observation to note, is that in the beginning you start out with a pale yellow mixture. By the time this mixture is cooked and ready to remove from the heat, the colour has changed to a caramel brown and will have become very thick and gooey.

The flavour is sort of a caramel/butter toffee type of thing and the dates really just fall apart, so there is no need to chop them up ahead of time unless you REALLY want to!

Here’s how to make THE BEST rice bubble/rice crispie treats around!!!


INGREDIENTS:

1½ Cups Sugar
200 Gms (7oz) Butter
2 Eggs
2 Tsp Vanilla
1 Pinch Salt
3 Cups Whole Pitted Dates
6 Cups Ricies (Rice Crispies/Rice Bubbles)


DIRECTIONS:

In a large pot, whisk the sugar and eggs together then, continue stirring over medium heat.

Add the butter and stir with a wooden spoon until well blended and the butter is fully melted and incorporated into the sugar and egg mixture.

Next, add the vanilla and salt and, when those are well incorporated, add the dates. The dates will automatically break down in the cooking process so no chopping is really necessary unless you prefer to cut them up first.


Now bring the mixture to a boil and simmer, stirring constantly, until thick & brown. Watch it carefully to prevent sticking and/or burning.

Cool the mixture for 5-10 minutes then add rice bubbles and mix until the rie bubbles are all well coated and everything is well combined.

Now, carefully tip out the mixture into a rectangle baking dish or aluminium tin about 13 x 9 inches or 30 x 25 centimetres.

Once completely cooled, cut into squares and it’s ready to eat.

This is especially sweet too, so have a glass of milk at the ready! This is quite a tasty snack and it is inexpensive to make. The squares are great for sharing at a party or taking to a friend’s place in exchange for a cup of tea. This is especially good for a quick & easy option for a school bring-along dish as well.

Cheers again Keri…


LOBSTER GRAMS
A GIFT FOR LONG-DISTANCE LOVED ONES


I remember having lunch one day, years ago now, with a workmate friend of mine in Portland, Oregon as we discussed a great new gift giving idea. She had ordered a complete lobster dinner for her mother-in-law's birthday, complete with the pot to cook it in as well as tools to break open the shells. Of course at that time I didn't really have a budget that would allow such luxurious generosity, nor did I have any friends or family too far from home that I couldn't just post something in the mail if need be. Nevertheless, I kept the idea in mind just in case my circumstances did change someday.

Fast forward now to today and I do live on the other side of the world and I do have the means to treat my family once in a blue moon. Well, last year I ordered my first lobster gram for Mom's birthday...a "Ship To Shore Gram For Two", because of course I couldn't let Dad eat spaghetti or Rice-a-Roni whilst Mom feasted on clam chowder, filet mignon, lobster and chocolate lava cakes, now could I?... It was a "grand slam", a "touchdown"...or a "try" for you rugby fans out there! What I am trying to say, albeit with cheesy sport analogies, is that they LOVED this gift and told me in no uncertain terms that I had spent too much (which I didn't) and that they'd be all too happy to get those in the future instead of the odd chocolate and licorice parcels from Kiwiland!

I was told that these dinners were of the highest quality, they came superbly packed in dry ice and, they came with thawing and cooking instructions as well as clarified butter for the lobster. Dad said it was better than any restaurant dinner he had experienced in a long time (and they like to eat out for birthdays, anniversaries, and the occasional night out just because...). It was a huge compliment from them and I was ever so pleased that they really felt treated.

If you are interested in having a look at the options available (they also do other seafood and steaks as well as desserts, sides, etc.), here is the link to LiveLob and a recipe blog for seafood and steaks. They even have a LiveLob review blog here if you are interested in having a peek.

In any case, I personally feel this was a fantastic idea for gift giving - especially if the recipient already has anything they might want or need. Next time you can't think of what to get Nana and granddad, or your favourite Aunt in California, have a look at the LiveLob web specials and see if one of their packages would be a good fit.

I have already inquired, and unfortunately they don't ship to international destinations...BUGGER...but, they are splendid for the rest of you and your kin.

Bon Appetite!

PECAN COBBLER

Yesterday we bid a fond farewell to one of my hubby’s co-workers who is going home after a secondment here for a few brief years. My hubby thought it would be a nice idea to invite him over for a barbecue and to have a few laughs. Well, what began as a small intimate gathering of friends soon turned into a little larger gathering with a few more colleagues joining the guest list each day. It almost seemed like every evening hubby would say to me, “oh, is it okay if ‘blankety-blank’ comes too???, because he/she also wanted to see Simon off…” Soon I was wondering once again if we would have enough seating for all of these people.

As it turned out though, we ended up with the perfect group of people, not too many and just enough to eat most of the food. To my surprise, one of the veggie hors de'oeuvres actually disappeared first and I even went back and made more! Our guest of honour was “fashionably late” so he missed out on the crostinis I duplicated from my night as a caterer for another friend’s party, and I thought I had enough of those to last quite a while, but there was more food to come...

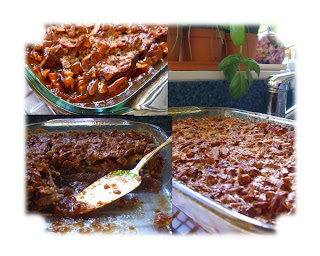
I had skewered some veggies as well as some lamb and some chicken that I had in separate marinades overnight (mmm, mmm, mmmm…that’s another post altogether!), and I made this fabulously amazing pecan cobbler to-die-for as a post-BBQ treat. I must give credit where it is due though, as this recipe was only slightly altered from another fellow food blogger’s site at
3 GIRLS, ME, AND A RECIPE a fellow Texan, as Texas was one of five states I grew up in. I nearly used kahlua in it as my Oregonian friend does with her pecan pie, but this was my first attempt at this recipe and I didn’t want to screw it up on my first go! I did double the vanilla extract/essence though and it was fabulous.

It is very difficult to get corn syrup here, but Davis Trading Co. in Petone does sell a similar product as “glucose – Corn Syrup”, although I had a couple of bottles of good old fashioned Karo left over from Thanksgiving...whew! I have also not been successful in locating any oat flour here, but I made my own with oats in a food processor and processed the heck out of them until they were a fairly finely ground flour/powder. In any case – here you go! Just look at that chewy, gooey goodness!!!


FILLING:

½ Cup Butter, melted
2½ Cups Light Corn Syrup
2½ Cups Sugar
1-2 Tbsp Vanilla Extract (I used 2 Tbsp)
5 Eggs, slightly beaten
3 Cups Pecans, coarsely chopped

CRUST:

1 Cup Oat Flour (1¼ Cups oatmeal processed to a fine powder)
1 Cup All Purpose Flour
½ Cup Butter
¼ Tsp Salt
¼ to ½ Cup Water


DIRECTIONS:

Preheat oven to 180 degrees C/350 F.

Spray 13 x 9 inch glass baking dish with non stick spray.

In a large bowl, mix together, butter, syrup, sugar, vanilla and eggs until well combined.
(If you measure and pour the butter in first, the syrup comes out of the measuring jug much easier because the sides of the jug are pre-lubricated.)

Next, pour approximately 2-2½ Cups of this filling mixture into the bottom of the prepared pan.

Now, add the pecans to remaining mixture and set aside.

In a separate bowl mix the flours and salt, then carefully cut in small pieces of the cold butter and combine well with a fork or pastry cutter until it’s about the consistency of coarse breadcrumbs.

Very slowly, add just a little cold water a at a time until dough forms a non-sticky ball and holds well together.

Now place the dough on a lightly floured surface, knead it only slightly and proceed to roll it out into approximately a 13 x 9 inch rectangle.

Gently place this crust on top of the filling mixture in the pan, and then carefully pour the remaining filling (with pecans) on top of dough.

Bake this for about 50 minutes until centre starts to set, but take care to protect your oven from spillage by placing your dish on top of some foil or on a baking sheet, as the filling may just overflow a bit whilst cooking.

Cool a minimum of 20 minutes before serving.

I served this delightful cobbler with whipped cream, however I imagine while it’s warm it would also be brilliant with ice cream.

Au revoir Simon, vous serez manqué. Restez en contact et veuillez ayez un bon voyage.

WOULD YOU TURN DOWN
RHUBARB PIE?


My next-door neighbour phoned yesterday afternoon and said she had remembered that I had mentioned that I had never tasted rhubarb before. She also said she had just made a rhubarb pie from the gorgeous rhubarb growing in her garden and asked if I’d like to try some of her pie…DUH!!! (Of course I said YES!)

I love swapping recipes (and samples) with Linda and her family. They have produced some amazing (some simple and some more complicated) treats to share with us.

So, last night after our supper we tucked into a genuine home-grown/homemade rhubarb pie. I always thought that rhubarb pie had to be red or pink, but this one was a sort of celery-green.

My hubby savoured each bite and talked about how long it had been since he had tasted this delicious treat and how it brought back memories (what a nice compliment really). I watched him first to see what his reaction was before I took my first bite. I had been warned about the very tart flavour, so I was a little trepidatious…but after the first bite, I was certainly hooked. I had a small piece warmed up last night, but prefer it cold like I had it this afternoon. In both cases it was very nice.

It’s a bit like a lemony tart really. Not too sweet like too many lemony treats are, and with a little whipped cream or ice cream it is just a brilliant thing to behold. Now I can imagine rhubarb and strawberry together, among other things, and I am looking forward to experimenting on my own and, of course, swapping one more recipe with Linda (thank you again!).

I wanted to know a little more about this funny vegetable, so I looked up a bit of info on it. Did you know that the leaves are toxic, or that the plants are grown not only as a food, but also as a medicinal plant? Some might be pleased to discover it was used as a slimming agent, but (wait for it)...only because of it's strong laxative effect. I suspect this is one veg you wouldn't want to binge on anyway...

Once I have done a little experimenting on my own and come up with something really lovely, I will post a rhubarb recipe for you all. Until then, you can drool over this photo of Linda’s pie…mmmmm.

CROSTINI WITH CHIVES,
FETA & BELUGA LENTILS


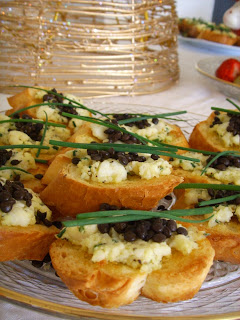
This is only but one lovely way to enjoy the unique legume known as the beluga lentil. I suppose it could be referred to as a poor man’s caviar with its beautiful sheen and jet-black colouring. These little gems are tasty in pilafs, vegetarian or otherwise, as well as hors de’oeuvres. I found a bag of these little black beauties at my local wholesale market and thought they looked interesting so I would give it a go and see what I could do with them.

I did a little research and discovered that Beluga Lentils are names for their caviar-like appearance in the fact that they remain whole and unbroken once cooked properly and maintain a shiny appearance, much like beluga caviar. I have only tasted caviar on two occasions and I still don’t understand what all of the fuss is about. To me it is just a VERY salty and VERY fishy condiment that really has no business in my kitchen. These little impersonators, on the other hand, are quite tasty and just as elegant to work with.

Combine these lovely legumes with cheese, chives and a garlic crostini and you have a winning combo, for certain.

I was recently asked to cater for a friend’s medi-spa,
Beautyworx, as she was having a holiday demo night for her preferred clients. I was happy to oblige and anxious to try a couple of new nibble recipes I had recently discovered in this food blogosphere.


Along with these crostinis, I also made up some cucumber boats with herbed cream cheese, basil leaves and grape tomatoes, a fruit skewer porcupine with white chocolate truffle dipped strawberries, baby-banoffi-bites with a rich chocolate ganache to hold the crusts firmly in place, and my own twist on a Kiwi favourite – the brandy snap (with a bit of kahlua in the whipped creamy filling).

In any case, here is my favourite recipe from that evening and it was truly a hit! Not a crumb was left to be seen…or eaten!

INGREDIENTS:

1 French Stick (baguette)
200 Gm (about 8 oz) Good Feta Cheese
2 Tbsp Cream Cheese, softened
1 Tsp (more or less) Freshly Cracked Pepper
¼ Cup Freshly Chopped Chives
3-4 Cloves Garlic, peeled & halved
* Good Quality Extra Virgin Olive Oil
¼ Cup Beluga Lentils, cooked in stock

* Amounts vary to individual tastes.


DIRECTIONS:

I pre-boiled my lentils in about 2 cups chicken stock for about 40 minutes, until tender, but you can use whatever stock you like or even just boil them in salted water, careful not to overcook them and end up with a mushy mess.

Preheat the oven to about 180 degrees C / 350 F.

Diagonally slice the baguette into 1 cm thick pieces and rub each on both sides with garlic.

Next, brush each side of the bread pieces with oil and arrange in a single layer on a baking sheet for toasting.

Toast each side between 6-8 minutes until golden brown and crispy.

Whilst the bread is toasting, mix the feta cheese and the soft cream cheese (cream cheese is to bind and keep the topping from falling off of the crostini).

Now add in the cracked pepper and chives and drizzle in some olive oil. The oil is to help incorporate all of the herb flavour and keep the cheese moist. It also tastes incredible.

All that is left now, is to top your crostinis and to share and enjoy!

There are two good ways to use the lentils. You can start topping the crostinis with the cheese mixture and then a small scoop of lentils on the top of the cheese or, you can mix in some lentils with the cheese and top the crostinis with the blended mixture.

I opted for the former then garnished with chives to give them a bit more of an elegant presentation for my friend’s party, but I mixed the lentils in another batch at home afterwards for the family and both ways are VERY tasty!

Best wishes to all of my friends and family for a healthy, happy and prosperous new year.

Cheers!